 If you ask us, we think you should host ownCloud on a Linux machine. We tried Windows Server before, but gave up in a pretty early stage. (Windows Server is not longer supported after version 8.0) So to make it easier for you guys that are in the same situation that we were – we have prepared a guide for those who want to do it themselves. We also made a pre-installed version of ownCloud that you can find here.
ownCloud 9 Installation
Our recommendation is to run your ownCloud install as a VM. Then you can use Windows as usual on your regular computer and install the server as a guest operation system. Of course you can also install ownCloud on a Linux dist directly.
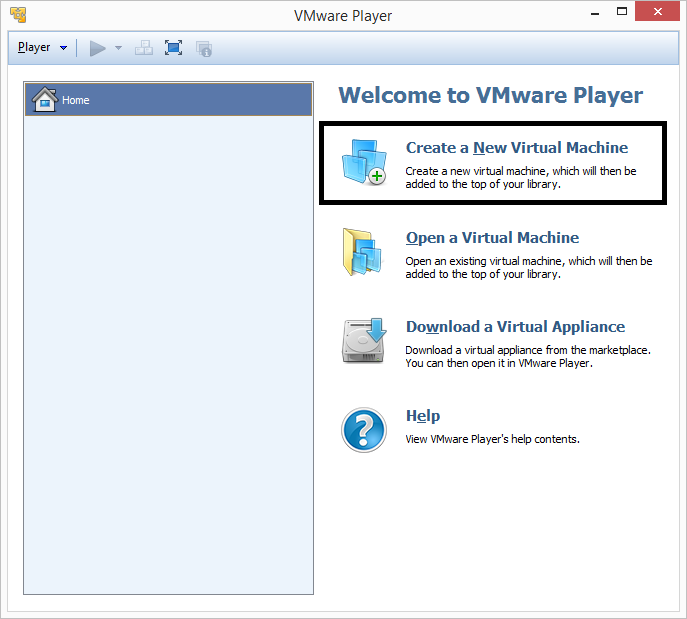
To do that you have to download VMware Workstation or some other program that you can host your VM on. Here are two free programs that you can use: VMware Player and VirtualBox, if your are on Mac.
Please note that this guide isn’t tested with Ubuntu 16.04. We would appreciate if you let us know if you manage to make it work with Ubuntu 16.04.
-
Create your Virtual machine
-
Set your PREFERENCES in your vm
We prefer to use “Bridged Mode” in our setup on the network for example. Then your IP won’t be the same as the host computer.
-
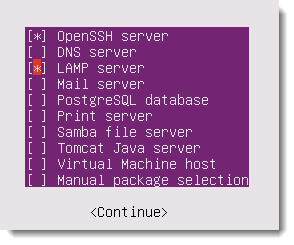
Install Ubuntu Server 14.04 LTS
Select OpenSSL + LAMP in the setup. Choose between the different options by pressing the space button.
-
Finish your installation of ubuntu
-
Set automatic upgrades
:~$ sudo dpkg-reconfigure -plow unattended-upgrades
-
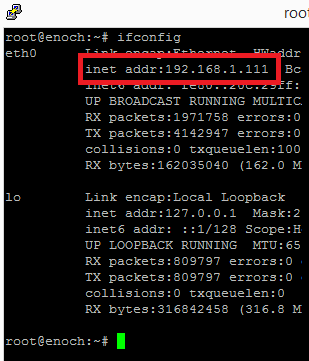
Check your internal ip
:~$ ifconfig
Use the IP that DHCP has given you to keep it simple. Look for the inet address.
-
Go to the network configuration file
:~$ sudo nano /etc/network/interfaces
-
Then put this in the interfaces file
 # The primary network interface
 auto eth0
 iface eth0 inet static

 address 192.168.1.XXX
 netmask 255.255.255.0
 broadcast 192.168.1.255
 network 192.168.1.0
 gateway 192.168.1.1
Instead of 192.168.1.XXX you put the IP that DHCP has given you in step 3.
-
Set the nameservers (using Comodo Secure DNS)
:~$ sudo nano /etc/resolvconf/resolv.conf.d/base
-
THEN PUT THIS IN THE resolv.conf base file FILE
nameserver 8.26.56.26
nameserver 8.20.247.20
-
MySQL housekeeping, press [Enter] to select default
:~$ sudo mysql_install_db
:~$ sudo mysql_secure_installation
-
Set hostname
This doesn’t have to be “owncloud”, it could be whatever you like. But you have to be consistent. In other words, use the same ServerName as Hostname.
:~$ sudo hostnamectl set-hostname owncloud
-
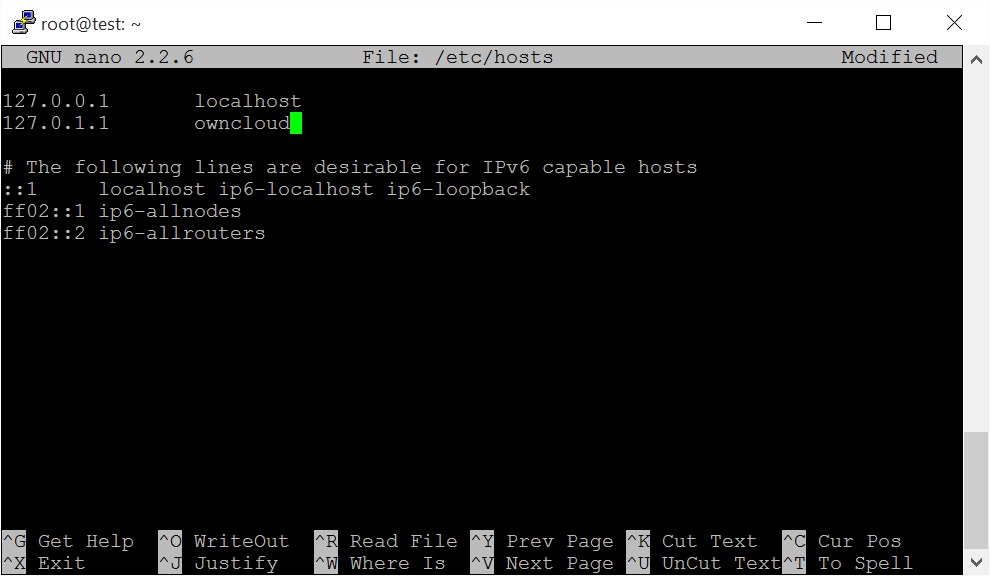
Change hostname in /etc/hosts
:~$ sudo nano /etc/hosts
Change from:
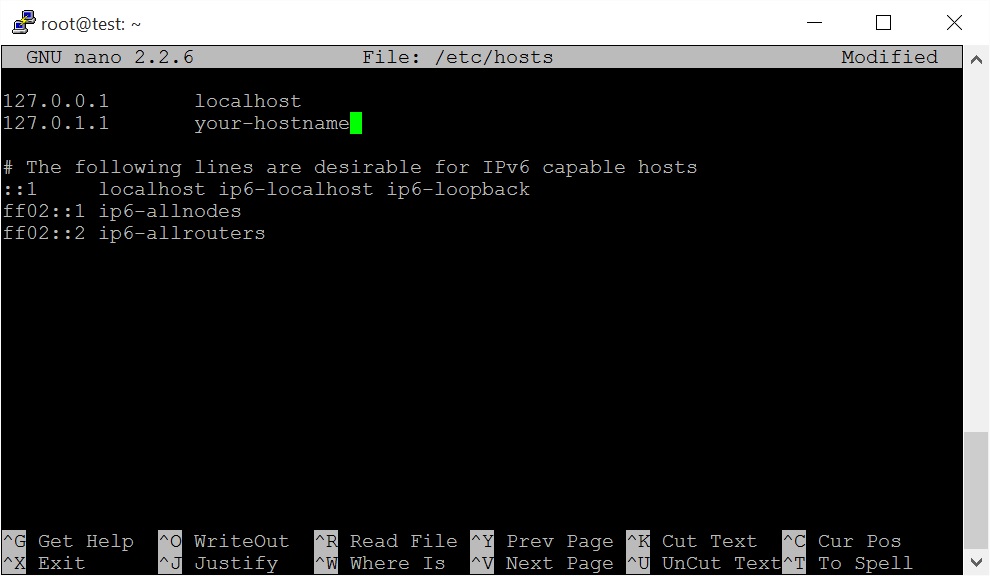
To this:
If you are setting up your server to be on a domain, it should be your domain name (example.com) in front of the hostname like this:
127.0.0.1 localhost
127.0.1.1 example.com owncloud
127.0.1.1 subdomain.example.com owncloud

# and so on....
-
Set Servername directive in apache
:~$ sudo sh -c "echo 'ServerName owncloud' >> /etc/apache2/apache2.conf"
-
restart network
:~$ sudo ifdown eth0 && sudo ifup eth0
-
Check if the network is working (otherwise some setting is wrong)
:~$ nslookup google.com
-
IF working the output should be something like this
Server: 8.26.56.26
Adress: 8.20.247.20

Non-authoritative answer:
Name: google.com
Address: 173.194.71.102
Name: google.com
Address: 173.194.71.138
-
If not working, nothing happens. Check your settings! You could also CONTACT US.
-
Install owncloud 9
There are different repositories for different OSes.
In this guide we use Ubuntu 14.04.:~$ sudo sh -c "echo 'deb http://download.owncloud.org/download/repositories/stable/xUbuntu_14.04/ /' >> /etc/apt/sources.list.d/owncloud.list"
:~$ sudo wget -nv https://download.owncloud.org/download/repositories/stable/xUbuntu_14.04/Release.key -O Release.key
:~$ sudo apt-key add - < Release.key && sudo rm Release.key
:~$ sudo apt-get update && apt-get install owncloud
:~$ sudo service apache2 restart
-
Install LibreOffice to be able to read .doc and .docx files:
:~$ sudo apt-get update
:~$ sudo apt-get install --no-install-recommends libreoffice-writer
:~$ sudo apt-add-repository ppa:libreoffice/libreoffice-4-4
-
Make sure that your /tmp is in ramdisk which improves session handling performance.
:~$ sudo echo 'none /tmp tmpfs, size=6g defaults' >> /etc/fstab
If you want to check that the setting went in, look inside the file
:~$ cat /etc/fstab
-
Set memcache
Memcache speed things up. This is how to set up APCu, but it’s recommended to use Redis Cache instead to handle the file locking mechanism better.
PHP 5.5:
:~$ wget https://gist.githubusercontent.com/enoch85/2367c396a2e119a12894/raw/16e7fc4db35d7bc74d27095c428f06102cbe14e0/install_apcu_4-0-6.sh
:~$ sudo bash install_apcu_4-0-6.sh
PHP >5.6:
:~$ wget https://gist.githubusercontent.com/enoch85/c504c4516e68bdcae7a2/raw/07c9817582c8b902b25a28c2349f4cdddba66571/install_apcu_4-0-7.sh
:~$ sudo bash install_apcu_4-0-7.sh
-
Go to ownClouds config.php
:~$ sudo nano /var/www/owncloud/config/config.php
Add this
'memcache.local' => '\OC\Memcache\APCu',
-
Reboot
:~$ sudo reboot
-
Create an account at http://192.168.1.XXX/owncloud
 MySQL user: [root]
 Password: [Your MySQL password]
 Database Name: [owncloud]
 Database Host: [localhost]
Change .XXX to your IP adress.
-
Secure your owncloud
Download this script to set proper permissions to your ownCloud folder.
Change “ocpath” and “htuser” user so that it fits your system, in Ubuntu 14.04 the htuser is ‘www-data’ and the path is
/var/www/html/ownloud
Though our recommendation is to always install the ownCloud core in
/var/www/owncloud
You can check which path owncloud is installed in by typing
:~$ ll /var/www
or
:~$ ll /var/www/html
-
RUN THE SCRIPT
:~$ sudo -i
:~$ nano /path-to-script/setup_secure_permissions_owncloud.sh
Here you set “htuser” and “ocpath” and check if the script is set up properly.
Save and exit the file with [CTRL+X] answer [y] and then [ENTER]
:~$ sudo bash /path-to-script/setup_secure_permissions_owncloud.sh
-
Open your owncloud config file
:~$ sudo nano /var/www/owncloud/config/config.php
-
Add this in config.php
'preview_libreoffice_path' => '/usr/bin/libreoffice'
-
Go to ownCloud apps and activate Douments
-
Go to owncloud Admin settings enable Word support

-
Enable SSL (RECOMMENDED)
:-$ sudo -i
:-$ a2enmod ssl && a2enmod headers && sudo a2ensite default-ssl
:~$ service apache2 restart
-
Set headers in your apache config
:~$ sudo nano /etc/apache2/sites-available/your-VHOST.conf
Add this value
<VirtualHost *:443>

Header add Strict-Transport-Security: "max-age=15768000;includeSubdomains"

SSLEngine on
A strong recommendation is to buy a real SSL certificate instead. You can get one on a TRIAL period of 3 months, and then extend for 4.95€ / year here.
You can also use this guide to setup you Virtual Host in Apache.
-
PUBLISH YOUR SERVER ONLINE
If you want others to access your ownCloud from outside your own network you have to make it public.
-
Update your system
:~$ sudo apt-get update
:~$ sudo aptitude full-upgrade
:~$ sudo reboot