We previously wrote about how to install Redis Cache Server in Ubuntu. And now when we used it for a while we also read some other guides on how to set it up correctly on a production server, to get a broader picture of which would be the best setting to speed things up even more. Please note that this post is based on Ubuntu Server 14.04.
We also checked the Redis log file and noticed that we had some warnings that needed to be addressed.
1. Raise somaxconn above 511
1417:M 25 Oct 06:13:31.840 # WARNING: The TCP backlog setting of 511 cannot be enforced because /proc/sys/net/core/somaxconn is set to the lower value of 128.
To fix this warning you have to set a new config to /etc/rc.local so that the setting will persist upon reboot
$~: sudo nano /etc/rc.local
Add this:
sysctl -w net.core.somaxconn=65535
When you reboot the next time, the new setting will be to allow 65535 connections instead of 128 as before.
2. vm.overcommit_memory = 1
1417:M 25 Oct 06:13:31.840 # WARNING overcommit_memory is set to 0! Background save may fail under low memory condition. To fix this issue add 'vm.overcommit_memory = 1' to /etc/sysctl.conf and then reboot or run the command 'sysctl vm.overcommit_memory=1' for this to take effect.
To fix this we simply just echo the needed line into the correct file
echo 'vm.overcommit_memory = 1' >> /etc/sysctl.conf
You can check that it was added with this command
cat /etc/sysctl.conf
3. Disable THP
1417:M 25 Oct 06:13:31.840 # WARNING you have Transparent Huge Pages (THP) support enabled in your kernel. This will create latency and memory usage issues with Redis. To fix this issue run the command 'echo never > /sys/kernel/mm/transparent_hugepage/enabled' as root, and add it to your /etc/rc.local in order to retain the setting after a reboot. Redis must be restarted after THP is disabled
This is also simple to fix by just running the recommended command as stated in the warning.
echo never > /sys/kernel/mm/transparent_hugepage/enabled
Go to /etc/rc.local
$~: sudo nano /etc/rc.local
Add this:
echo never > /sys/kernel/mm/transparent_hugepage/enabled
Now this will be persistent upon reboot as well.
4. Use UNIX socket instead of port 6379
- When the server and client benchmark programs run on the same box, both the TCP/IP loopback and unix domain sockets can be used. Depending on the platform, unix domain sockets can achieve around 50% more throughput than the TCP/IP loopback (on Linux for instance). The default behavior of redis-benchmark is to use the TCP/IP loopback.
- The performance benefit of unix domain sockets compared to TCP/IP loopback tends to decrease when pipelining is heavily used (i.e. long pipelines).
- Unix domain sockets are often twice as fast as a TCP socket when both peers are on the same host. The Unix domain protocols are not an actual protocol suite, but a way of performing client/server communication on a single host using the same API that is used for clients and servers on different hosts. The Unix domain protocols are an alternative to the interprocess communication (IPC) methods
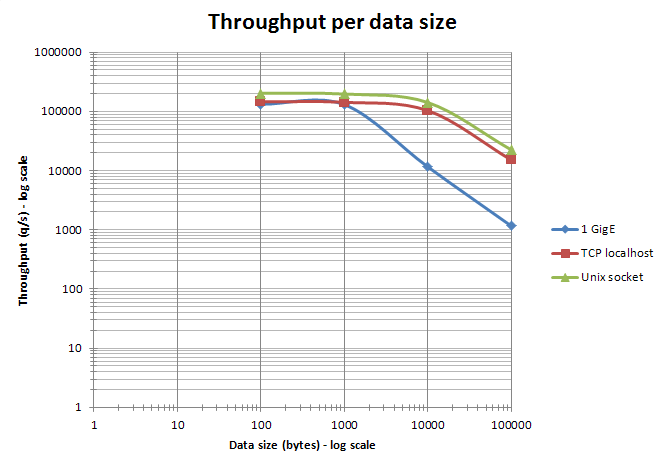
As you can see, there is a huge difference in using the UNIX socket instead of a regular TCP port. It’s pretty much straight forward, and easy to fix.
-
Change the redis conf file
$~: sudo nano /etc/redis/6379.conf
Your file name could be different, we just used the default, proposed by the install script when we installed Redis.
-
Change these values
Un-hash these values and change them like this:
unixsocket /var/run/redis.sock
unixsocketperm 777
# Accept connections on the specified port, default is 6379.
# If port 0 is specified Redis will not listen on a TCP socket.

port 0
-
Change the ownCloud config
'memcache.local' => '\\OC\\Memcache\\Redis',
'filelocking.enabled' => 'true',
'memcache.distributed' => '\\OC\\Memcache\\Redis',
'memcache.locking' => '\\OC\\Memcache\\Redis',
'redis' =>
array (
'host' => '/var/run/redis.sock',
'port' => 0,
'timeout' => 0,
'dbindex' => 0,
 ),
-
Restart Redis
$~: /etc/init.d/redis-server restart
-
Change /etc/init.d/redis_6379
To be able to reboot with the new UNIX socket you have to change some code in /etc/init.d/redis_6379. If you don’t do this, the system will freeze because it’s trying to shutdown via port.
$~: sudo nano /etc/init.d/redis_6379
First you have to add a variable in the top of the file.
EXEC=/usr/local/bin/redis-server
CLIEXEC=/usr/local/bin/redis-cli
PIDFILE=/var/run/redis_6379.pid
CONF="/etc/redis/6379.conf"
REDISPORT="6379"
SOCKET=/var/run/redis.sock
And change this
stop)
if [ ! -f $PIDFILE ]
then
echo "$PIDFILE does not exist, process is not running"
else
PID=$(cat $PIDFILE)
echo "Stopping ..."
$CLIEXEC -p $REDISPORT shutdown
while [ -x /proc/${PID} ]
do
echo "Waiting for Redis to shutdown ..."
sleep 1
done
echo "Redis stopped"
fi
;;
To this:
stop) if [ ! -f $PIDFILE ] then echo "$PIDFILE does not exist, process is not running" else PID=$(cat $PIDFILE) echo "Stopping ..." $CLIEXEC -s $SOCKET shutdown while [ -x /proc/${PID} ] do echo "Waiting for Redis to shutdown ..." sleep 1 done echo "Redis stopped" fi ;; -
Success!
Now you successfully configured Redis with UNIX socket instead, and also made the necessary changes to ownCloud config.
5. Redis-CLI
As we now changed to a socket instead, we have to use another command to get to the cli command line
$~: redis-cli -s /var/run/redis.sock